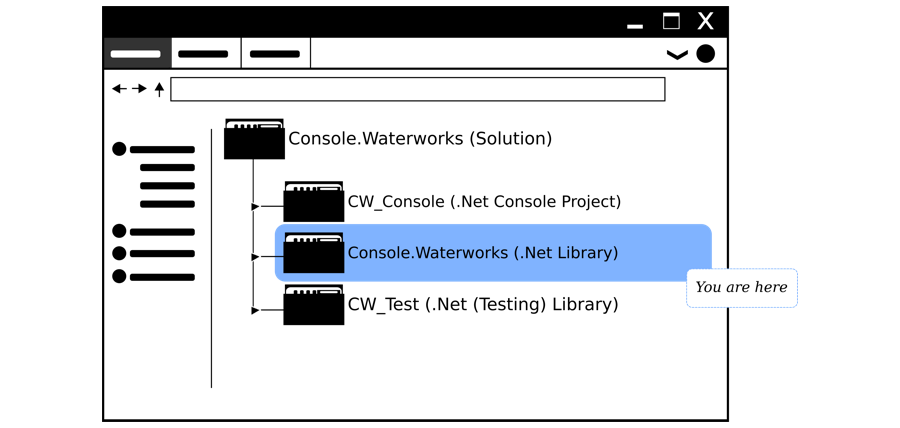
This project is a .Net 4.7 library, written in C#. Within the project, you will see eight folders and eighteen files in total. The layout of these files and folders are shown in the image below.
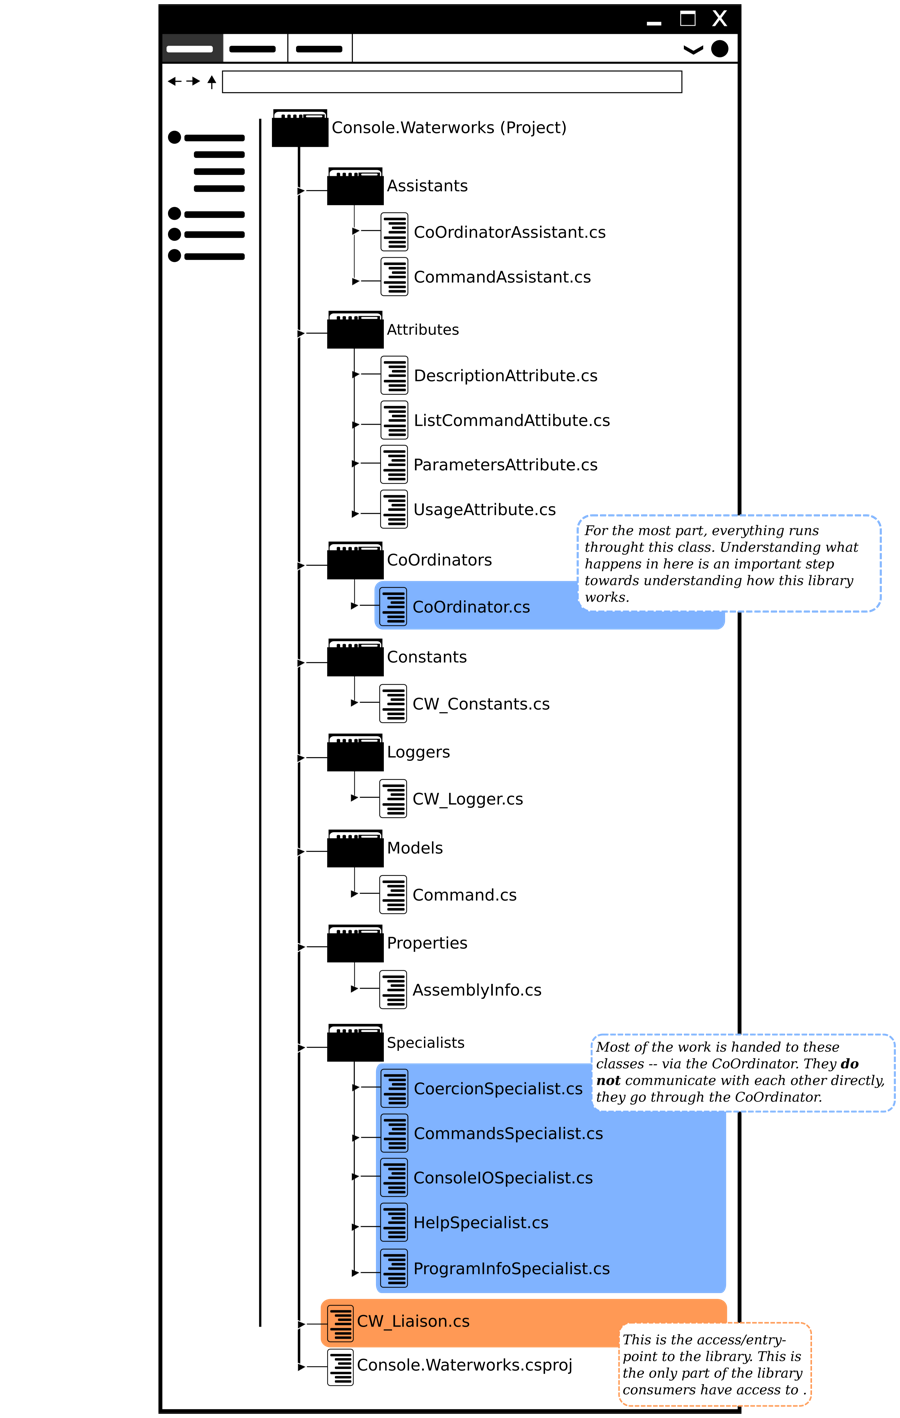
Before going into further detail... If you want to jump straight into the code, CW-Liaison.cs is the place to start. It is the entry point to the library when using it in a project.
"Console.Waterworks.csproj" is a typical C# project file -- found with all Visual Studio projects. So, you should not need to touch it and the reason why I will not focus on it. The same applies to "Assemblyinfo.cs" which resides in "Properties".
The way I have structured the files and folders in this project remind me of departments in a company. I do not know if this will help you but it is there if it does. It is, also, why I am going to run through the files and folders at the same time. I see the folders as the departments and the files within them as the workers. So, separating them out seems redundant at this point -- seeing as this is the "introductions" stage.
To be clear, some files (and folders) are more important than others. You do not need to have a good grasp of what every file does for you to get started.
Assistants
The "Assistants" folder houses the CoOrdinatorAssistant and CommandsAssistant. These files offer support to their namesake counterparts (in other folders). For example, CoOrdinatorAssistant provides "helper" functions for CoOrdinator in the "CoOrdinators" folder.
Attributes
This folder houses the following files:
These attributes (files) are what you decorate your command-methods with. If a user decides to use Console.Waterworks' (C.W.) built-in run-time -help system-, these files are what they will end up using. The classes/objects within these files tend to only interact with the HelpSpecialist.
To help you get a sense of how to use these files/classes, please use the following links (all found in "As a NuGet" section of this wiki):
CoOrdinators
The only files in this folder is:
-With that said, there is nothing stopping you from adding more Co-Ordinator classes in the future. It all depends on how complex the library gets.-
This file connects all the other files together. This is most critical part of the system. When you have grasped what is happening in CoOrdinator, everything else should start falling into place. CoOrdinator connects all the other files together by assigning them tasks. When they have finished their tasks, they return their results to the CoOrdinator. From there, CoOrdinator will forward the result on to the appropriate class/object. The main idea behind CoOrdinator is to limit/control the flow of data in the system. To help explain the above, please read the following page:
Constants
There is only one file in "Constants" which is:
This files handles the libraries' constant variables. You have access to CW-Constants throughout the codebase but consumers of C.W. do not. Another way look at this file is as the libraries' settings/preferences (as code of course).
Loggers
The only file in here is:
Its main purpose is to document the flow of C.W. I tend to use it for testing purposes most of the time. An important note to make is none of the logging events will show in projects which -consume- this library (as a NuGet package). Also, I tend to control the CW-Logger via CoOrdinator, for the most part. You are not limited to using CW-Logger that way, though. If you want, you can call/control is at any point throughout the system.
-The point about adding more Co-Ordinator classes (Loggers in this case) to the system in the future applies here.-
Models
Another folder with one file in it, which is:
This file is responsible for how the command-method must look -- from the (console) end-user and (developer) consumer. Altering this file will affect the way the end-user will enter commands into the console and how you construct them. Because of that, be careful when/if you make changes to this file.
Specialists
This folder houses the most files and is where you will spend most of your time. The files in here are where the CoOrdinator hands most of its tasks off to. The list of files in this folder are as follows:
- CoersionSpecialist.cs
- CommandsSpecialist.cs
- ConsoleIOSpecialist.cs
- HelpSpecialist.cs
- ProgramInfoSpecialist.cs
As their names imply, each file/class specialises in one area and does not venture outside of it. The idea here is CoOrdinator hands work over to the appropriate specialist. When the specialist finishes its task, it returns its result back to CoOrdinator. This makes it easy (easier?) to create conveyor-belt-like work/dataflows in the system. I, also, find it easier to narrow down any problems -- let's hope you do too.
The CoercionSpecialist handles the coercing of the end-user's input into a data type C# understands. There is a limit on the amount of data types Console.Waterworks works with. So, make sure you familiarise yourself with them. A complete list of the types C.W. can coerce is available at the following link:
With that said, that does not mean you are stuck with the defaults C.W. provides. You are more than welcome to expand or contract that list.
The CommandSpecialist is in charge of determining what command-methods are available at run-time. It, also, determines the name of the "ConsoleCommands" class and its location. So, if you want to change any of these properties, this is the specialist you need to deal with.
The next specialist is the HelpSpecialist. This one handles the organising of the "help" section. It, also, provides said help section at run-time. It does this by checking every command-method for any Console.Waterworks attributes attached to it. Once it has done that, it can hand the information back to CoOrdinator, then the Liaison and the console.
The ProgramInfoSpecialist provides information about the console program at run-time. If you would like to change what it shows when the console program starts, you can do it in two places. The first is to hard-code it in here but this would not be my first choice. The second place is to use the information "Assembly Information". You can find this by opening up the projects properties page which you can see in the image below.

I ran through a lot of information there and at a brisk pace. So, to help with the information overload, here is an illustration to help breakdown it down.
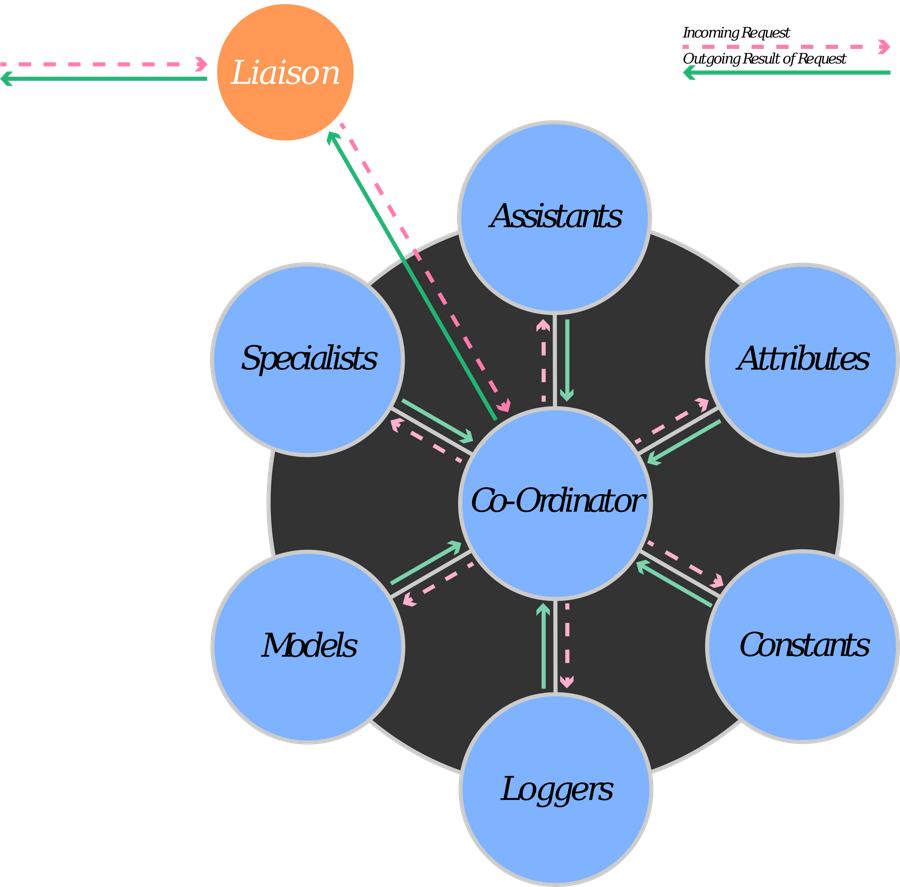

Table of Contents
As Source Code
Console.Waterworks
- Console.Waterworks Home
- Console.Waterworks Project Breakdown
- Console.Waterworks Flow
- Coercion Types List
- The Help Attributes