4.7 KiB
Return to Ritherdon: Flicker
This a Python 3 project which provides a breakdown of the data produced by 'Personal Flash in Real-Time' artwork. The data analysis provided by Flicker is for the health and safety assessment concerns regarding epilepsy -- when the artwork is exhibited in a public (I.E. art gallery) setting. This code base has no immediate bearing on the 'Personal Flash in Real-Time' artwork and its various components. This is strictly data analysis (for health and safety).
'Personal Flash in Real-Time' is an artwork which consists of three smaller projects. They are:
- Light Meter
- Relay
- Midpoint
- Personal Flash in Real-Time Documentation (This provides documentation for the whole project/artwork)
The data Flicker breaks down is the SQLite database used by the Midpoint project. Light Meter is responsible for taking and sending light readings (in the various welding booths in Ritherdon) and sending them to Midpoint -- where they are stored. Relay is responsible for requesting those light readings (from Midpoint) and controlling the lights connected to it/them in the art gallery (I.E. Castlefield) based on those light readings.
For the health and safety assessment, please use the following link:
The assessment goes through and explains how to interpret the data -- which is outside the scope of this document.
Project Set-up
This assumes you are using Linux, specifically Debian or Ubuntu, and have Python 3 already installed. Other environments have not been tested.
After you can cloned the repository, you will need to set-up a Python virtual environment and install its requirements.
git clone http://git.abbether.net/return-to-ritherdon/flicker.git
cd flicker

# Adjust the location for your 'venv' to whatever you prefer. This is
# just a default example.
python3 -m venv venv

# Activate the virtual environment.
source venv/bin/activate

# Install the projects requirements.
pip install -r requirements.txt
From there, you should already have the data which needs processing. Because of the nature of this repository, I have transferred the data to it manually. There is no automated way to get the latest version of the data. I do not have any plans to add this as a feature.
The project structure should look something like the following,
flicker/
├── LICENSE
├── README.md
├── requirements.txt
└── src
    ├── data
    │   ├── test-data.csv
    │   └── test-data-lite.csv
    ├── flicker.py
    └── services
        ├── data_services.py
        ├── io_services.py
        └── log_services.py
Note: You will need to create the results folder and its 'result
files' separately. This is because they are included in the
.gitignore file -- so the commit history does not get clogged-up.
To finalise setting up the project and begin the analysis, run the following commands,
# Make sure you have activated the virtual environment. Can ignore if
# you already have.
# cd flicker
source venv/bin/activate

# These files are used for intermediate storage whilst processing the
# data. The 'final' results are stored in 'filtered_flicker_entries.csv'
mkdir data/results
touch readings-per-sec.csv
touch readings_above_threshold.csv
touch flicker_list.csv
touch filtered_flicker_entries.csv

# To start the data processing -- which might take a while...
python src/flicker.py
For how the analysis is done, read the flicker.py file (I.E. the
'main'/entry-point file). Each stage is separated and documented
within it. You can quickly jump to said file by clicking the link
below:
Essentially, this is just a glorified script but I have separated out the logic into various files and directories because that's just how I like to roll. Was this necessary? Not really. It is what it is, though. How the files are connected are shown in the diagram below.
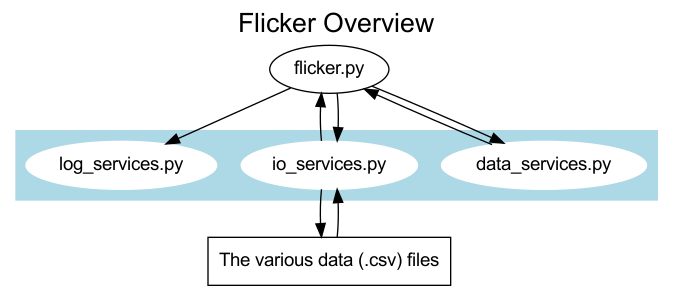
The main reason for separating out the code like this was because I
felt like it aided in explaining what the code was doing in
flicker.py via the use of comments. I could document things at a
high level in flicker.py and you could dig down into the various
function calls if you need/want to.