|
|
3 years ago | |
|---|---|---|
| attachments | 4 years ago | |
| .gitignore | 4 years ago | |
| LICENSE | 4 years ago | |
| README.md | 4 years ago | |
| cli_meter.py | 3 years ago | |
| light_meter.py | 4 years ago | |
| make-log-files.sh | 4 years ago | |
| shutdown.sh | 3 years ago | |
| startup.sh | 3 years ago | |
README.md
 Return to Ritherdon Project
Disclosure: This file was written by Craig Oates and all information I have cited about the other parties where taken from their respective websites. I have, also, applied minor editing in places to help readability - in the context of this file. Please use the links listed below for the original/official version of the sourced material. Craig is the author of the software in this repository.
Project Overview: Return to Ritherdon
"Return to Ritherdon" is a two year residency at Ritherdon & Co Ltd, a manufacturer of metal enclosures based in Darwen, Lancashire U.K. It was devised by artist Nicola Ellis and funded by Arts Council England.
About the Artist: Nicola Ellis
Nicola is interested in the properties, value, function and circulation of materials. She has a current focus on metals and the companies that work with them, her work draws on the visual and spoken language of industry operations, fabrication and profiling processes. The parameters for her sculpture, installation, drawings and videos include relationships between people, businesses and technology.
About the Manufacturer: Ritherdon
Established in 1895, Ritherdon have been manufacturing a variety of electrical enclosures and related products for many decades. A combination of a passion for innovation with close working relationships with their customers means that they are continually developing and expanding their product ranges.
About: Arts Council England
They were set up in 1946, by Royal Charter, to champion and develop art and culture across the country. They are governed by an Executive Board and National and Area Councils.
Project Overview: "Unnamed at time of writing"
This repo. (Light-Meter) is part of a bigger project which is one of several artworks created by Nicola Ellis throughout the course of the residency. For the sake of brevity, this file will focus on the technical aspects of the project. The same is true for all files in the repository.
The overall project ("UNNAMED" not Return to Ritherdon) consists of three separate/smaller projects. The names of the smaller projects are a by-product of the software development process. You should not view them as individual pieces within the overall project. From an artwork point-of-view, "UNNAMED ART WORK" is one piece. The name of the software projects are "light-meter" (which is this one), "mid-point" and "relay". All three projects reside in their own git repositories. You can find the other project's repositories at the following links:
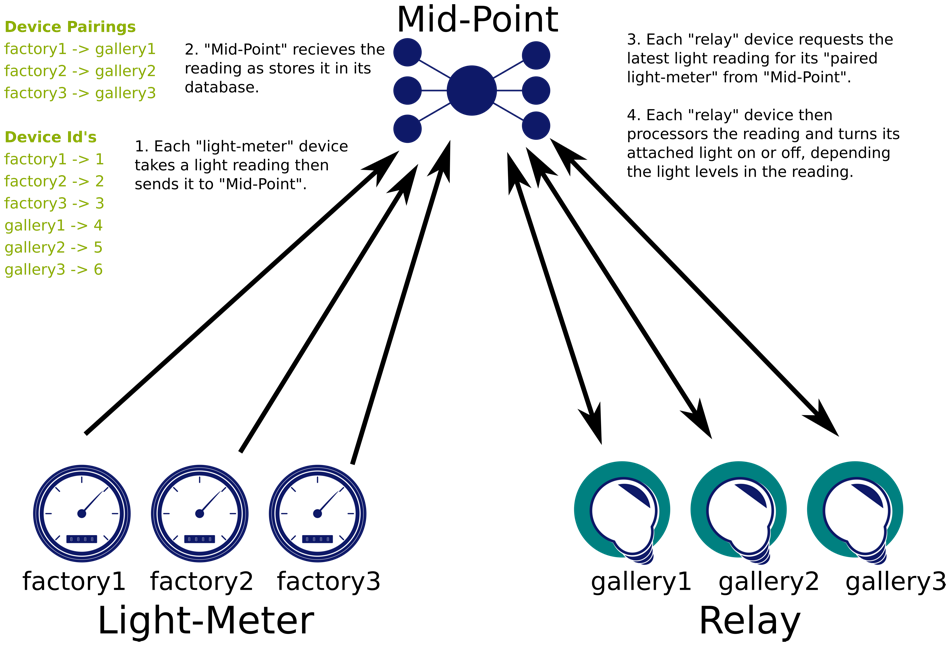
The (technical) aim of the project is to turn a set of lights on at the gallery when the welding machines are active in the welding booths at Ritherdon. The solution we arrived at was a three-stage process. The stages are as follows:
- Monitor the light levels in the welding booths at Ritherdon and send that information to a sever.
- Receive the light readings and store them in a database and make them available for others to access.
- Have the lights installed at the gallery connected to wi-fi enabled relays which request the latest light readings from the server. If the readings are above a certain threshold, have the light in the gallery turn on (otherwise, turn off). The relays are responsible for turning the lights on and off.
Each step should require no human intervention.
For more information on how each project accomplishes its task, please use the (repo.) links above. Otherwise, here is an diagram to help explain the three stages mentioned above.
 Light-Meter
Project Overview: Light-Meter
This is a Python 3 based project. I wrote the code in this repository to run on a Raspberry Pi in an unmanned capacity. The main machine I tested the code on was a Raspberry Pi 4 (2 G.B.) but I did get it to work on a Raspberry Pi 1 (Model B) -- so do with that what you will. Software-wise, I have only used Raspbian Buster throughout the development of this project. So, I do not know how well this will run on other Linux-based operating systems. I must stress, this is a Linux-only endeavour. This will not work on Mac OS and Windows -- that includes Windows Subsystem for Linux (W.S.L. 1 and 2).
For the final version (exhibition context), the intended operating system is Raspbian Buster Lite. That is the version of Raspbian without a (desktop) G.U.I.
The full list of parts required for this project is as follows:
- Raspbian (You can use the G.U.I. or "headless" version)
- Raspberry Pi 4 (I am assuming you have the appropriate power cable, S.D. cards Etc.)
- [Light Sensor] (https://www.amazon.co.uk/s/ref=as_li_ss_tl?url=search-alias=aps&field-keywords=LDR&linkCode=ll2&tag=pimylifeup-21&linkId=8662811b5623ce86540420c7e8ce0268&language=en_GB) (I tend to use "light sensor" and "light meter" interchangeably -- sorry if confusing)
- 2 x 1kΩ Resistor
- 330nF Capacitor
- Breadboard (Optional but recommended if you do not know how-to solder or you don't feel comfortable doing it)
- [Jumper Wires] (https://thepihut.com/products/rpi-premium-jumper-wires-40pk-male-female-100mm?_pos=18&_sid=4d08c5200&_ss=r) (I'm assuming you are using the breadboard. If are not, you might need different cables like Female-to-Female or ones without a connector on the ends)
Initial Raspbian Set-up
Upon the initial installation of Raspbian on to the Pi, you need to make sure the following is established:
- The username is "rtrp".
- The host-name is "factory#" (where "#" is a number between 1 and 3).
- The Pi is set to auto-login with the "rtrp" account.
You can set the Pi up to automatically login to the desktop but the recommended option is to login to a "headless" environment (I.E. console-mode). Remember, you can only log into the desktop environment if your version of Raspbian has one. The final version of this project does not expect one.
Hardware Preparations
Network Connections
Before installing the Raspberry Pi in its final location (gallery/exhibition), make sure it can connect to the galleries internet -- either via wi-fi or Ethernet cable. If you use an Ethernet cable, you do not need to do anything, but the wi-fi requires a little work on the command-line (if you are using a "headless" version of Raspbian). If you are unsure how to connect to a router via wi-fi, use the following link to learn how:
The easiest way to do this is via the "raspi-config" file/command. You can access it by entering sudo raspi-config into the console and entering the "Network Options" section. For the other ways of connecting to a wireless network, I recommend you read the tutorial because it can get complicated and the options are numerous.
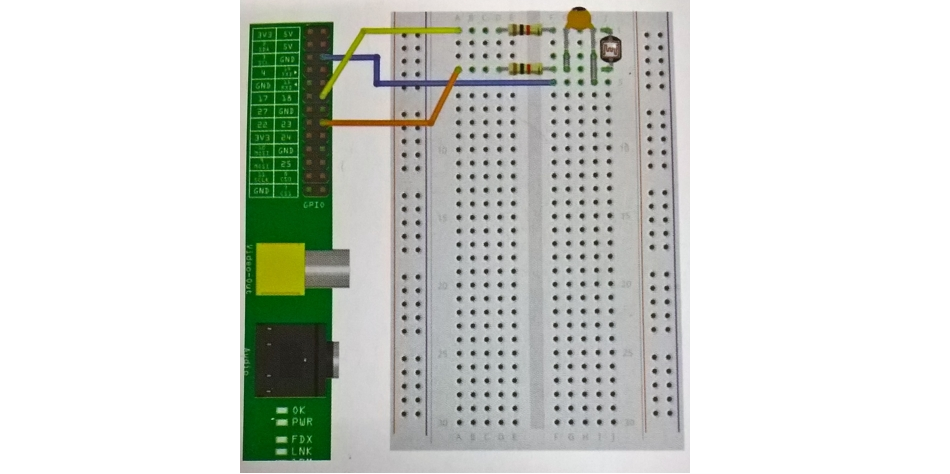
Light-Meter Set-Up
The light-meter is a custom addition to the Raspberry Pi which is built using the Pi's general-purpose input and output (G.P.I.O.) pins. You can see the layout of the components connected to the Pi in the diagram below.
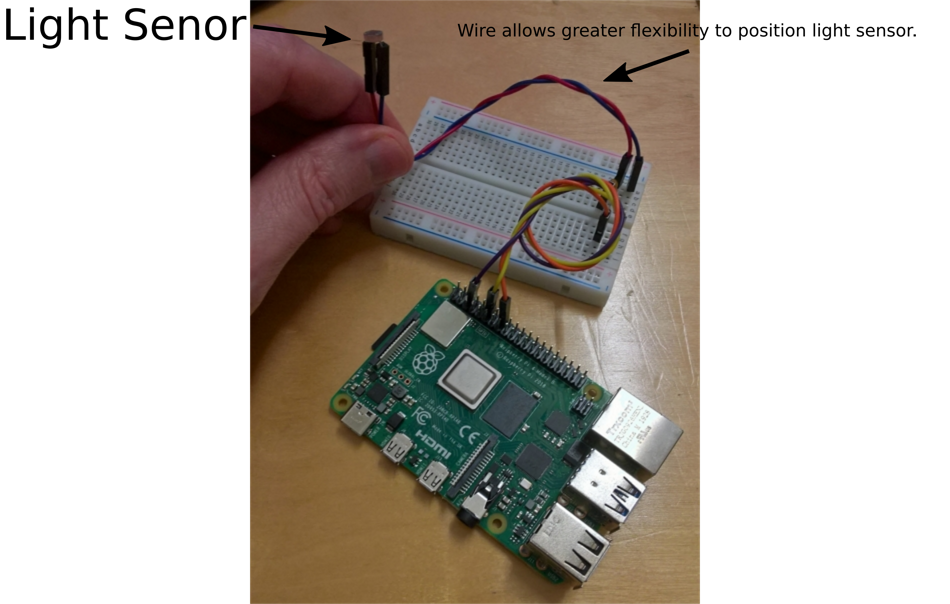
Depending on the type of enclosure you use, you might find it more convenient to have the actual light-meter (component) connected to the breadboard with a pair of jumper wires. To help explain the point, please see the image below.
Power Supply
I am under the impression this device will run in a fully functional building (I.E. the Ritherdon factory). Because of this, I have taken no precautions or steps to assume a loss of power beyond the typical scenarios found in a U.K. factory environment. Because of this, I have no idea how the Pi will operate whilst powered via batteries or other "mobile" power sources. With that said, make sure you can place the Pi where you want it whilst still being able to power it.
Software Preparations
Depending on what version of Linux/Raspbian you are running, you might need to install some dependencies. I have listed the common ones I came across whilst developing this project. But, you might need to rely on your own cunning to track down missing dependencies.
# Don't forget to apt update and upgrade first...
sudo apt install python3-pip

sudo pip3 install requests
sudo pip3 install RPi.GPIO

# You might need to install RPi.GPIO via apt
sudo apt install python3-rpi.gpio

# I will explain why this is here below...
mkdir ~/repos
Note: I decided not to create/use a (Python) virtual environment because of the projects objectives. I expect the software in this repository to run on an unmanned machine with only one task to complete. The environment this project will run in/on will not change throughout the course of the exhibition. So, the redundancies afforded by the virtual environment are not needed.
When you clone this repository, you need to make sure you clone it into the following location: /home/rtrp/repos/light-meter/. From there, run the following command,
# This must be the first thing you run after you have cloned
# the repository.
. ~/repos/light-meter/make-log-files.sh
You can test the code is working properly by running it. You can do that by entering sudo python3 ~/repos/light-meter/cli_meter.py into the console. This is assuming the server specified in "cli_meter.py" is set-up and working as intended.
Note: For some reason, I had trouble running "cli_meter.py" without sudo. I would sometimes get an error message saying "RPi.GPIO is not available/installed" (paraphrased). If you manage to get it working without the use of sudo, remain as you were. Otherwise, keep a mental note of this if you come across the problem.
When you are ready to run this project as intended, you can set-up a cron-job for it. To do so enter sudo crontab -e into the console (see note about sudo above). You might need to select an editor if this is your first time setting up a cron-job. I tend to go for Nano -- which is option "1" most of the time. When the crontab file opens, enter the following commands at the bottom of the file,
@reboot bash /home/rtrp/repos/light-meter/startup.sh &
00 18 * * * /home/rtrp/repos/light-meter/shutdown.sh
These tasks make the Raspberry Pi send a message to the sever to indicate its/their status ("on" or "off") and makes the "cli_meter.py" script run. At this point, you should be able to walk away and let the Pi do its thing. This is assuming the server is up and running and the Pi is connected to the world-wide-web. If all is successful, you will notice the Pi will turn itself off at 18:00 (6 p.m.) and will start sending light reading when you turn it on without any input from you. Unfortunately, the Pi can only manage the shutdown procedure on its own. You will need to turn it on. (This has been accounted whilst the exhibition is open.)
To make sure the Pi sends a "powering down" message to the server, I tend you create an alias called powerdown. When you type this into the console, it runs the "shutdown.sh" script -- which has the shutdown command within it. To make the alias permanent, enter alias='~/repos/light-meter/shutdown.sh' into ~/.bashrc. This is easier to test the bespoke shutdown procedure is working as intended. You can, also, adjust the time in the crontab or run the script by running the script like you normally would but I find them to be frustrating to do in this instance.